
Activity 4: compositional decisions
Introduction
Resolving the work involves drawing together earlier experiments, explorations and learning experiences and provides the opportunity to apply this knowledge. Each student makes decisions about the design and composition for the self-portrait that will reflect their personal environment.
Resources
- Paintings and drawings discussed in previous activities
- Completed elements of student self-portraits
- The following image:
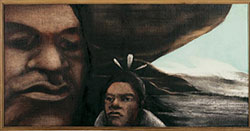
Te Puhi o te tai Haruru, 1984–85
Reproduced courtesy of the Museum of New Zealand Te Papa Tongarewa
Artist: Tony Fomison
-
Activity stepsShow details
Te Puhi o te tai Haruru
- Refer to the painting Te Puhi o te tai Haruru, 1984–85 by Tony Fomison, and works discussed earlier, to provide stimulus for a discussion about composition. In this example the artist has positioned the face very close up as a compositional device. The face covers a third of the frame in the elongated landscape.
- Possible questions:
Te Puhi o te tai Haruru, 1984–85
Reproduced courtesy of the Museum of New Zealand Te Papa Tongarewa
Artist: Tony Fomison- What is your first thought when you look at this artwork? Which part of the painting gave you that impression? Can you name a visual device that the artist used for this reaction?
- Can you imagine something about the background?
- Are there any clues about where these people may live or their culture?
Composition
Students make compositional decisions about their self-portrait.
- Orientation of the paper: landscape or portrait.
- Positioning the self-portrait drawing:
- Using the cut-out drawing completed in Activity 2.2, try different placements on the paper until the desired position is found.
- Draw a pencil line around the edges of the drawing as a guide to where to place and glue the drawing when the background has been painted. This pencil line also shows the space to leave when painting the background.
- Gluing the drawing into position last ensures there is a strong contrast between this part of the work and the background, as well as eliminating any accidental paint on the drawing.
- Selecting the images to be used as the background, experimenting with size and placement:
- Using the images developed in Activity 2.1, students make some small compositional drawings, trying different sizes. They place the drawings in different positions, taking up all the background space around the area left for the drawing.
- When they are satisfied, the final background composition is drawn onto the paper ready for painting.
- Colour scheme for the images and surrounding space:
- Select one of the four colour schemes for the background composition that will support the self-portrait.
- Paint the background composition. All the space outside the gap left for the self-portrait drawing is painted in the selected colour scheme.
- Management, care and procedure for painting:
- Glue the self-portrait line drawing back into position when the background is complete.
- Using line pencil drawing, or paint if necessary, fill in any spaces between the drawing and background so that the artwork appears to be on one piece of paper.